

This is my original guide that I posted online on another forum site on 10-13-2006. I've posted it in a couple of places since then, and thought I would share it here. It's funny -- reading original lines that I had written (such as: ...obviously, where it says to take a screen shot in an Everest room, unless you have a screen shot of your character in an Everest room right now, there isn't any way you can do that now). Haha... you'll be able to do that SOON. I've changed the wording so it's current.
 ")
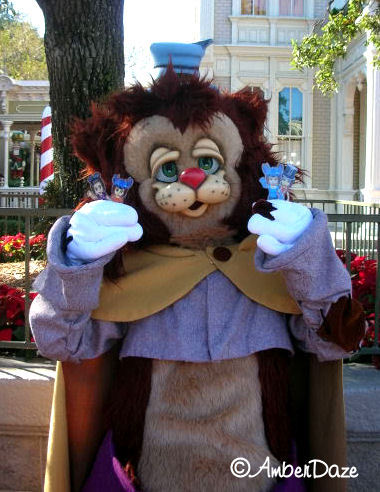
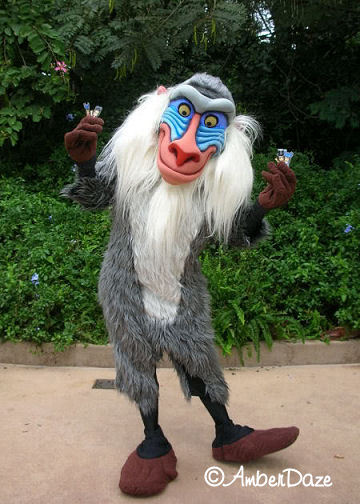
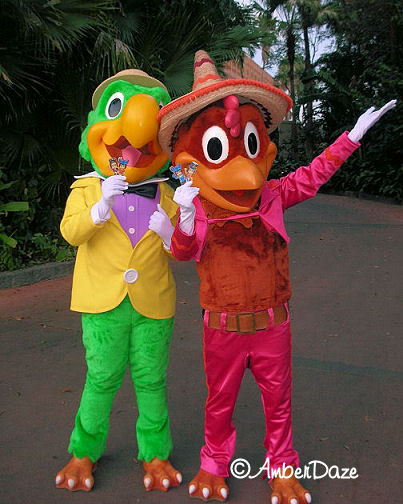
I have quite a few photos of WDW characters holding my character flats, and will be adding those to this thread.
BTW... You can use these tips to create ANY character flat -- it doesn't have to be Disney.
So... here's my Guide to Making VMK Character Flats!
Hope this helps you!
1. Choose a favorite outfit for your character
2. Take a screen shot of your character (preferably on a white background, like in an Everest room)
How to take a screen shot:
In Windows: Press the "Prt Scr" or "Print Screen" button. It will copy whatever you see on the screen to your clipboard. Then you can paste it wherever you want.
If you're using a Mac: (the following has not been verified by me, so if anyone can confirm it -- I'd appreciate it). Press Command + Shift + #3 key all at once to take a picture of the entire screen. Pressing Command + Shift + #4 keys all at once will allow you to take a picture of whatever area you select with the mouse. The pictures will be saved in the main level of your hard drive, and it will be called "Picture 1," then "Picture 2," etc. Screen shots are saved in PICT format.
3. Paste your screen shot into your favorite Paint program, and edit.
If using PAINT: Click "Edit," then "Paste." Your image will appear in the Paint window. There you can preview your image (Click "File" --> "Preview"), and Print if you like the size of your current image. If you would like to enlarge or reduce the size of your image, you can play with "Image" --> "Stretch." To keep your image in proportion, be sure to use the same percentage for horizontal and vertical.
If using a program such as PAINT SHOP PRO (PSP): Click "Edit," then "Paste." Your image will appear in the PSP window. Now you can do many things to your image, including sharpening the focus, enlarging or reducing to a size you specify, and taking out the background image or color. Newer versions of PSP easily allow you do one click changes. If you have a paint program that can resize and increase the no. of pixels to about 300...your image will come out much clearer. If you need any specific information on how to do any of this, just send me a PM and I will be glad to help.
Changing the size of your image in PSP: I have made my flats about 4" high. You can make yours larger or smaller -- it's all a matter of preference. If you would like to enlarge your image, click "Image" --> "Resize." The locations of actions may be different in different versions of PSP, but you can run a search in there to find out where "resize" is for example. You can crop your image to remove excess background, then choose what size to make your image, and remove the background completely using the background eraser tool (in PSP X).
Once you have your image ready to print, you can preview it (print preview or print layout). In newer versions, print layout allows you to view how your image looks on a printed page, and you can move them around and position them as you like. You can also resize them here if needed. Then click "print." Choose "properties" to choose the print quality (I always print my flats using "best"), and then "print."
4. Cut out your flat: If you care about having your character looking like he/she is really a little person, then cut your flat out exactly along the lines. If you don't care, you can leave some room around the edges. You can either get your flat professionally laminated at a place such as Staples, or buy a package of small self-adhering laminating paper and laminate it yourself. Pros of professional laminating: flats will be much sturdier and not easy to bend. Either way you decide to laminate, when you cut around the edges of your laminated flat, be sure to leave just a little excess around the edges. Now your flat will be waterproof.
5. Make your flat part of your photo! There are a few ways to make your flat stand alone. You can either stick it to a popsicle stick or straw or... you can get something like "Fun Tak," where you can tear off tiny pieces and stick it to the back of your flat. I choose to use Fun Tak -- it really makes it easy to stick my flat almost anywhere I want, with no sticks sticking out. Be creative! It's YOUR flat!
Tips on how to get your flat to print out at about 4" tall, without looking too pixelated.
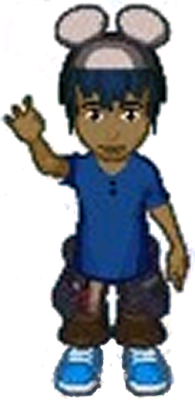
I'll use Illusionistic's character as an example (thanks for being the model!).
1. The best room to take a screen shot is in an Everest room (the white background is the easiest to remove in this room, and it's also one of the rooms where you'll get a bigger screen shot of your character). Let's just pretend that you're seeing the entire Everest room below (cropped to save space):

2. Once you have a screen shot of yourself in the Everest room, crop out the background, just around the top and bottom of your character. You want to resize this image to 4" in height, so try not to have a lot of background space at the top or bottom. See below for an example:

3. Once you have your image cropped, you want to resize this. Since I have a few Paint Shop Pro versions (this guide was written with PSP X in mind), I'll describe what to do in there...although you should be able to do the same in any other photo program. Click on the image you want to resize. Then click on image --> resize --> where it says "print size" change the height to 4 inches (make sure that the box is clicked where it says "lock aspect ratio," so the width stays in proportion to the height). After you change the height to 4 inches, change the resolution to 300 pixels. Click "ok" and your image should be ready to print. Make sure your printer properties are at least normal or better.
If you have Windows Paint, and click on image --> stretch & skew to approximately 235 horizontally and vertically, it should yield similar results. OR you can click on image --> attributes and put in 4" for height...only problem here is that it does not automatically set the width for you. The problem in both Windows Paint options, is that there is no way that I can see to increase the number of pixels to sharpen your image as you enlarge it. See example below of enlarged image (your image will look taller than 4" on your monitor):
**NOTE: No matter what I did, I was not able to directly link to an image in my Photobucket to show the actual size. I had to upload all images in this post from my computer. This next image was automatically resized to be smaller than it actually is (how do you upload images and keep them the actual size?). Your actual image should look taller than 4" on your monitor.**
4. OPTIONAL STEP: Next step is to get rid of some background -- easy to do in a photo or graphics program. In Paint Shop Pro X, there is a background eraser button on the left (it's ok if you don't get rid of all the background white space, since you're going to be cutting much of it away anyway). See below for an example:

Save your image as a .PNG (makes a sharper image than .JPG, and allows you to keep the background silhouetted if you choose). Now you can print your image (from your paint program), and it'll be a cute 4" tall, not-too-pixelated little person.
A few more tips, and possible problems you may encounter...
If you have Windows Paint, and click on image --> stretch & skew to approximately 200-235 horizontally and vertically, it should yield similar results (you can try printing them to see which size works for you). OR you can click on image --> attributes and put in 4" for height...only problem here is that it does not automatically set the width for you. The problem in both Windows Paint options, is that there is no way that I can see to increase the number of pixels to sharpen your image as you enlarge it. See example below of enlarged image (your image will look taller than 4" on your monitor).
If you took screen shots in an Everest or similar-sized room, your characters should be about 118 pixels high. In order to make them 4" (you can make them smaller or larger, this is just my favorite size), you would need to resize them to about 3048 pixels (2580). This size is from top of your peep to the bottom, no background.
Once you crop your peep in a paint program, you can use one of the following sites to resize (not sure of maximum increase on some of them, but others I have seen have a maximum of 1000 pixels).
I have not tested any of the following sites...
http://picresize.com/legacy/
http://www.resizeyourimage.com/
http://www.shrinkpictures.com
Now go make your flat!
~Days
I've changed the wording so it's current. I have quite a few photos of WDW characters holding my character flats, and will be adding those to this thread.
BTW... You can use these tips to create ANY character flat -- it doesn't have to be Disney.
So... here's my Guide to Making VMK Character Flats!
Hope this helps you!
1. Choose a favorite outfit for your character
2. Take a screen shot of your character (preferably on a white background, like in an Everest room)
How to take a screen shot:
In Windows: Press the "Prt Scr" or "Print Screen" button. It will copy whatever you see on the screen to your clipboard. Then you can paste it wherever you want.
If you're using a Mac: (the following has not been verified by me, so if anyone can confirm it -- I'd appreciate it). Press Command + Shift + #3 key all at once to take a picture of the entire screen. Pressing Command + Shift + #4 keys all at once will allow you to take a picture of whatever area you select with the mouse. The pictures will be saved in the main level of your hard drive, and it will be called "Picture 1," then "Picture 2," etc. Screen shots are saved in PICT format.
3. Paste your screen shot into your favorite Paint program, and edit.
If using PAINT: Click "Edit," then "Paste." Your image will appear in the Paint window. There you can preview your image (Click "File" --> "Preview"), and Print if you like the size of your current image. If you would like to enlarge or reduce the size of your image, you can play with "Image" --> "Stretch." To keep your image in proportion, be sure to use the same percentage for horizontal and vertical.
If using a program such as PAINT SHOP PRO (PSP): Click "Edit," then "Paste." Your image will appear in the PSP window. Now you can do many things to your image, including sharpening the focus, enlarging or reducing to a size you specify, and taking out the background image or color. Newer versions of PSP easily allow you do one click changes. If you have a paint program that can resize and increase the no. of pixels to about 300...your image will come out much clearer. If you need any specific information on how to do any of this, just send me a PM and I will be glad to help.
Changing the size of your image in PSP: I have made my flats about 4" high. You can make yours larger or smaller -- it's all a matter of preference. If you would like to enlarge your image, click "Image" --> "Resize." The locations of actions may be different in different versions of PSP, but you can run a search in there to find out where "resize" is for example. You can crop your image to remove excess background, then choose what size to make your image, and remove the background completely using the background eraser tool (in PSP X).
Once you have your image ready to print, you can preview it (print preview or print layout). In newer versions, print layout allows you to view how your image looks on a printed page, and you can move them around and position them as you like. You can also resize them here if needed. Then click "print." Choose "properties" to choose the print quality (I always print my flats using "best"), and then "print."
4. Cut out your flat: If you care about having your character looking like he/she is really a little person, then cut your flat out exactly along the lines. If you don't care, you can leave some room around the edges. You can either get your flat professionally laminated at a place such as Staples, or buy a package of small self-adhering laminating paper and laminate it yourself. Pros of professional laminating: flats will be much sturdier and not easy to bend. Either way you decide to laminate, when you cut around the edges of your laminated flat, be sure to leave just a little excess around the edges. Now your flat will be waterproof.
5. Make your flat part of your photo! There are a few ways to make your flat stand alone. You can either stick it to a popsicle stick or straw or... you can get something like "Fun Tak," where you can tear off tiny pieces and stick it to the back of your flat. I choose to use Fun Tak -- it really makes it easy to stick my flat almost anywhere I want, with no sticks sticking out. Be creative! It's YOUR flat!
Tips on how to get your flat to print out at about 4" tall, without looking too pixelated.
I'll use Illusionistic's character as an example (thanks for being the model!).
1. The best room to take a screen shot is in an Everest room (the white background is the easiest to remove in this room, and it's also one of the rooms where you'll get a bigger screen shot of your character). Let's just pretend that you're seeing the entire Everest room below (cropped to save space):
2. Once you have a screen shot of yourself in the Everest room, crop out the background, just around the top and bottom of your character. You want to resize this image to 4" in height, so try not to have a lot of background space at the top or bottom. See below for an example:
3. Once you have your image cropped, you want to resize this. Since I have a few Paint Shop Pro versions (this guide was written with PSP X in mind), I'll describe what to do in there...although you should be able to do the same in any other photo program. Click on the image you want to resize. Then click on image --> resize --> where it says "print size" change the height to 4 inches (make sure that the box is clicked where it says "lock aspect ratio," so the width stays in proportion to the height). After you change the height to 4 inches, change the resolution to 300 pixels. Click "ok" and your image should be ready to print. Make sure your printer properties are at least normal or better.
If you have Windows Paint, and click on image --> stretch & skew to approximately 235 horizontally and vertically, it should yield similar results. OR you can click on image --> attributes and put in 4" for height...only problem here is that it does not automatically set the width for you. The problem in both Windows Paint options, is that there is no way that I can see to increase the number of pixels to sharpen your image as you enlarge it. See example below of enlarged image (your image will look taller than 4" on your monitor):
**NOTE: No matter what I did, I was not able to directly link to an image in my Photobucket to show the actual size. I had to upload all images in this post from my computer. This next image was automatically resized to be smaller than it actually is (how do you upload images and keep them the actual size?). Your actual image should look taller than 4" on your monitor.**
4. OPTIONAL STEP: Next step is to get rid of some background -- easy to do in a photo or graphics program. In Paint Shop Pro X, there is a background eraser button on the left (it's ok if you don't get rid of all the background white space, since you're going to be cutting much of it away anyway). See below for an example:
Save your image as a .PNG (makes a sharper image than .JPG, and allows you to keep the background silhouetted if you choose). Now you can print your image (from your paint program), and it'll be a cute 4" tall, not-too-pixelated little person.
A few more tips, and possible problems you may encounter...
If you have Windows Paint, and click on image --> stretch & skew to approximately 200-235 horizontally and vertically, it should yield similar results (you can try printing them to see which size works for you). OR you can click on image --> attributes and put in 4" for height...only problem here is that it does not automatically set the width for you. The problem in both Windows Paint options, is that there is no way that I can see to increase the number of pixels to sharpen your image as you enlarge it. See example below of enlarged image (your image will look taller than 4" on your monitor).
If you took screen shots in an Everest or similar-sized room, your characters should be about 118 pixels high. In order to make them 4" (you can make them smaller or larger, this is just my favorite size), you would need to resize them to about 3048 pixels (2580). This size is from top of your peep to the bottom, no background.
Once you crop your peep in a paint program, you can use one of the following sites to resize (not sure of maximum increase on some of them, but others I have seen have a maximum of 1000 pixels).
I have not tested any of the following sites...
http://picresize.com/legacy/
http://www.resizeyourimage.com/
http://www.shrinkpictures.com
Now go make your flat!
~Days
 c:
c:


")


